

How To Transfer Music From Iphone To Mac Air
How to Transfer Music from iPhone to Mac When iTunes Not Working
 By Alice Yang to iPhone Manager, Transfer Music | Last Updated on Sep. 21, 2020
"Recently, I have bought a new iMac. Now I want to import all my music from my iPhone to my MacBook. However, it seems a little bit difficult for me to transfer songs from iPhone to Mac. Is there anyone can help get out of this trouble? Thanks in advance."
Believe it or not, iTunes is absolutely most common used to transfer music from iPhone to Mac. Generally, it might work well to sync iPhone music to Mac for experienced Apple users. But for a novice, iTunes can be a disaster. It's not only complicated in steps, you may also be annoyed with growing problems deriving from iTunes errors and inherent limitations. Check out why iTunes is not a preferred solution for music transfer from iPhone to Mac.
1. Firstly, to get an access of your iPhone music through iTunes, you have to authorize your Mac. Yet, each Apple ID can authorize a maximum of 5 computers.
2. iTunes only allows you to transfer music purchased from iTunes Store. It's helpless for songs ripped from CD or downloaded from other sources.
3. Once you sync your music from iPhone to Mac with iTunes, the original music files on iPhone were erased, leading iTunes library disappeared on your source device. You can't keep them both on iPhone and Mac.
4. iTunes 12 or newer is really buggy that users never stop complaining about it for freezing their computer, removing album art, crashing when opened etc.
5. iTunes was shut down by Apple.
Therefore, to break these iTunes limits, you need an iTunes alternative, which allows a seamless music transfer from iPhone to Mac. MacX MediaTrans is the tool you need.

Sync Music (iTunes Purchased or Not) from iPhone to Mac with
MacX MediaTrans! - Simplest solution to transfer iPhone MP3, AAC, M4P to Mac.
 Bulk sync iPhone music to Mac at 5X faster speed & create/edit/delete music.
Remove DRM from iTunes purchased music and convert AAC/M4P to MP3.
Auto convert FLAC, WMA, AIFF, etc. to MP3 when import music to iPhone.
Move music, ringtones, iTunes purchases, video, pics between iPhone and Mac.


An Effective iPhone Music Manager to Transfer Songs from iPhone to Mac
MacX MediaTrans is a cutting-edge iPhone music manager that gives you full freedom to transfer music from iPhone to Mac and vice versa without erasing raw music data on iPhone. It's the best alternative to iTunes as it does what iTunes can and cannot do when transfer music files.
First and foremost, there is no computer authorization limit and you don't have to log in your Apple ID to transfer both purchased or non-purchased music from iPhone to Mac. It also allows you to remove DRM from iTunes purchased music and convert M4P or M4B audio tracks to MP3 format for playback for sharing with family or friends, even without an Apple ID. On the other hand, if you have some other formats music on your Mac such as OGG, FLAC, WMA, AIFF, ALAC, DTS, RA etc. audios downloaded from online or ripped from CD or DVD discs, this program will automatically convert them to MP3 or AAC when importing from Mac to iPhone. In addition, you can make a management of your iPhone music on Mac simple and organizedly, like creating playlist, make ringtones for iPhone, batch edit artist infomation, bulk delete music from iPhone 11/11 Pro(Max)/XR/XS/X/8/7/6S/SE and so on.
Besides music, MacX MediaTrans supports wide file types for transferring, from videos, movies, Camera Roll, Photo Library, Podcasts, iTunes U, TV Shows, to Audiobooks and lots more. And similar to music files, it can also auto convert any videos, be it 4K, H.265, MKV, AVI etc. to MP4 when transferring from Mac to iPhone. The impressive USB flash drive feature also makes MacX MediaTrans unique, letting you use iPhone as an USB to store Microsoft Office Word, Excel, slidshow, applications, zip, etc. if your iPhone has extra space left.
[Tutorial] How to Transfer Music from iPhone to Mac with MacX MediaTrans
1.1 How to Sync Music from iPhone to MacBook Pro/Air, iMac
The below tutorial will show you how to transfer songs from iPhone to MacBook or iMac with button clicks (drag and drop also supported) with non-protected music. If you wanna read the guide to sync protected music from iPhone to Mac, scroll down to the section titled with 1:2.
Step 1: Plug in Your iPhone to Mac
Free download MacX MediaTrans on Mac OS X 10.6 or above. Then connect your iPhone to Mac computer with USB cable. You'll be noted with a hint to Trust this computer at the first time. Just select "Trust this computer" on iPhone to get an access of your iPhone.
Step 2: Select the Target Music
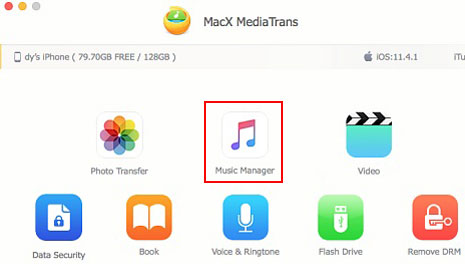
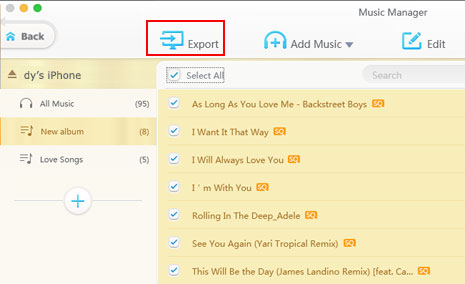
Click "Music Manger" button on the main interface to access the Music Manager sub-window. In the right content column, choose the target music tracks by ticking on the box at the preamble one by one, or checking the box of "Select All".
Step 3: Export Music from iPhone to Mac
Tap "Export" button at the top of the panel to sync music from iPhone to Mac. The iPhone music transfer tool delivers an ultra fast speed, up to 5 times faster than any others to export iPhone music to Mac computer.
1.2 How to Export Apple Music from iPhone to Mac for Sharing among Apple IDs or to Non-Apple Devices
You're supposed to stay here if the music on your iPhone is purchased from Apple Music and protected by DRM. This tutorial will show you how to decode DRM protected music and transfer protected music from iPhone to Mac. Plus, this thoughtful iPhone transfer app can even auto convert protected M4P music to MP3 for your convenient playback with VLC player, Android devices, or sharing among different Apple IDs.
![]() Please note that the precondition is only for personal legal usage, not for piracy or any illegal activity.
Please note that the precondition is only for personal legal usage, not for piracy or any illegal activity.
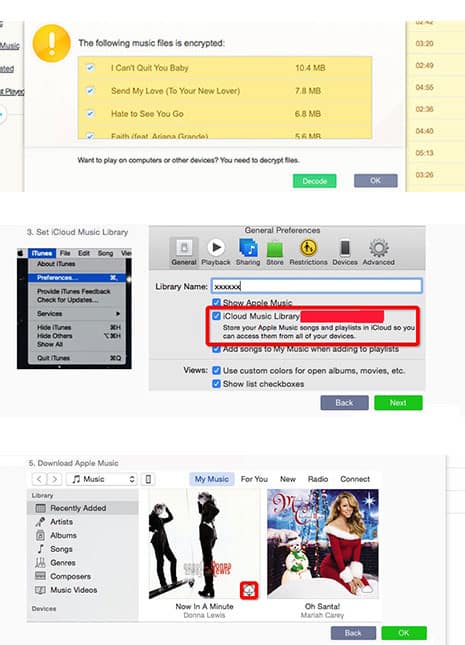
Step 1: Choose the purchased music you want to transfer from iPhone to Mac.
Step 2: Tap "Decode" to get rid of iTunes DRM protection; or click "OK" if you don't have such need. (in case you choose not to decode music, you can directly click "Export" button to transfer iPhone encrypted M4P music to Mac.)
Step 3: Sign in to the iTunes Store on your Mac with your Apple ID; then tap "Next" button to continue.
Note:
To decode and put iPhone protected Apple Music to Mac, you need to check if the music on iPhone and iTunes is synchronized. If yes, just skip this part; if not, follow the tips to sync iPhone music to iTunes first.
1. Open iCloud Music Library on your iPhone.
2. Sign in to the iTunes Store.
3. Set iCloud Music Library.
4. Share iTunes Library XML with other library on Mac's iTunes.
5. Download Apple Music on iTunes.
Step 4: Tap "OK" after this DRM removal tool successfully removes iTunes DRM protection from Apple Muisc.
Step 5: Press "Export" button to transfer iPhone decrypted Apple Music to Mac.
When the whole music transfer process is over, you can open the iPhone music on Mac and will find that the M4P files now are transcoded DRM-free MP3 format. Hence, there is no burden for you to play iTunes purchased music on Zune, MP3 player, Android, Microsoft devices, game consoles and more.
1.3 How to Transfer Playlist from iPhone to Mac (macOS 11 Big Sur incl.)
For those who sort out iPhone songs into different playlist like favorite songs; recent play songs; Sports music, light music, R&B music, Hip-hop music, etc. and wanna transfer the whole playlist songs from iPhone to Mac, the operating process is still dead easy. Read on!
Step 1: Get iPhone Music Manager Ready. The first step is the same as previous one. No repetition here.
Step 2: Enter your iPhone music management interface via "Music Manager" button. Then double-click the iPhone music playlist you wanna transfer and then tick "All" at the top left of the whole music list.
Step 3: Press "Export" button and then the MacX MediaTrans' built-in media transfer engine will run into action to transfer playlist from iPhone to Mac with incomparably fast speed (Intel QSV supported).
Warm Prompt: In case you are sick of some music playlists and wanna delete music playlist from iPhone, you just select them on the left-side of the interface, right click to choose "Delete" and then these playlists will be removed instantly.

How to Transfer Music from iPhone to Mac Using iTunes
Definitely, if you're an experienced iTunes user who cares less about its limits on computer authorization, data erasing, unidirectional sync etc., you can use iTunes to transfer music from iPhone to Mac. For example, when you have sufficient remaining authorization slots for Mac computer, you're about sync iPhone music to Mac to free up more storage space on iPhone, or all your music files are purchased from iTunes Store, iTunes comes an nice choice. Let's see how to do it.
Step 1: Launch iTunes on Mac. (Here, you're walmly suggested to download the latest iTunes version.)
Step 2: Get your iPhone connected to Mac computer with a USB cable. Afte that, authorize your computer in iTunes and enter your Apple ID and password to sign in.
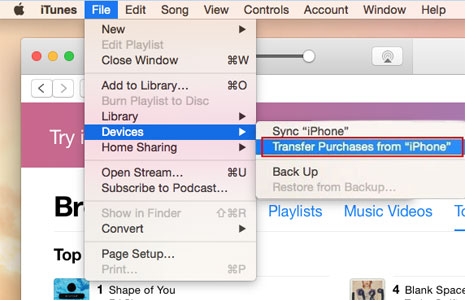
Step 3: Go to File > Devices and click "Transfer Purchases from [your device]" from the drop-down menu. Then, the music will be imported from iPhone to Mac.
MacX MediaTrans - Transfer iPhone Songs to Mac with No Wait
Best iPhone Music manager - batch move off music from iPhone to Mac with world's fastest speed (3 seconds for 20 songs export). Transfer music, photos, videos, ringtones, iTunes purchases, audiobooks, podcast, iTunes U, etc. no wait! (Intel QSV accelerated speed)
How To Transfer Music From Iphone To Mac Air
Source: https://www.macxdvd.com/mobile/transfer-music-from-iphone-to-mac.htm
Posted by: savoiesendes.blogspot.com
0 Response to "How To Transfer Music From Iphone To Mac Air"
Post a Comment